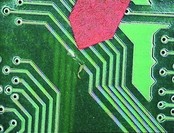
 Damaged Trace
 By Bob Wettermann
This will be a review, based on the IPC 7721 guidelines, the steps involved for repairing a PCB trace using the epoxy method.
First clean the area using isopropyl alcohol.
Next remove the damaged section of the circuit using a sharp Exacto style knife. The damaged circuit should be trimmed back to a point where the circuit still has a good bond to the PCB surface. Use a knife and scrape off any solder mask or coating from the ends of the remaining circuit. Remove all loose material and clean the area.
Next apply a small amount of liquid flux to the ends of the remaining circuit and tin the exposed end of each circuit using solder and a soldering iron.
Select a replacement circuit trace to match the width and thickness of the circuit to be replaced. Cut a length of replacement trace to the approximate length needed. The replacement PCB trace should overlap the existing circuit a minimum of 2 times the circuit width.
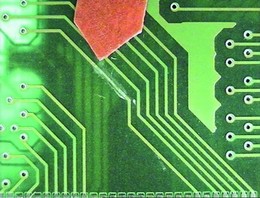
Repaired Trace
Gently abrade the top of the replacement trace to remove the protective coating (used to prevent oxidation). Next, clean the circuit trace.
The ends of the replacement circuit trace may be tinned with solder prior to lap soldering it in place. Apply a small amount of liquid flux to the overlap joint. Lap solder the circuit trace to the circuit on the circuit board surface using solder and a soldering iron. Make sure the circuit trace is properly aligned.
Now coat the top and sides of the replacement trace with epoxy. A wooden stick sharpened at one end may be used to apply and spread the epoxy.
Cure the epoxy.
In order to evaluate the final repair visually examine the trace for alignment and overlap of the replacement traces. Visually examine the epoxy coating for texture and color match. Perform electrical tests as necessary.
